 |
| Holds |
| Ordering info |
| Video Center |
| Plastic Sucks! |
| Editor's Choice |
| Training Info |
| Wall build info |
| Links |
| Bouldering |
| Coming soon |
Although you usually don't have a problem with T-nuts falling out of their holes, two methods to insure they won't are to glue your T-nuts into the holes and placing 2 tiny wood screws to lock them in place.
As an alternative to hammering your T-nuts into place, use a bolt and washer to draw the T-nuts into place by tightening the bolt. This method sets your T-nuts better so you won’t have any problems when you mount holds on them for the first time.
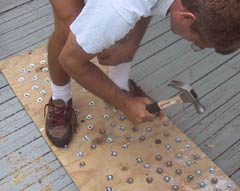
Yet another T-nut placing method is to place a 3/8 inch bolt through the T-nut hole, screw a T-nut onto the bolt, and then hammer the T-nut into the hole. This method is a lot faster than drawing the T-nuts into place but it also insures that the T-nut will be aligned. In general the thicker your wall material, the more problems you will have getting T-nuts aligned.
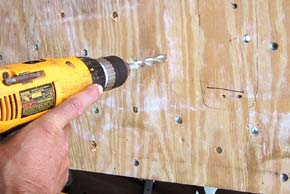
If you encounter lots of resistance when you first start to screw a bolt into a T-nut, stop, don’t force the bolt as you can strip the threads. Re-insert the bolt so that it is better aligned. If you have a lot of sheets to drill you can save time by stacking them and drilling several at the same time. Try to use a sharp wood bit when drilling your T-nut holes to minamize the wood splitting out the back of your hole.
T-nut spacing
The minimum number of T-nuts to use is about 15 for a 4 by 8 sheet, while 25 (about one every square foot) is much nicer. 25 T-nuts per sheet is about the minimum for a school or camp wall. A good amount for a rock gym is about 50 per sheet, although you might not be able to achive this with a highly textured wall. For a steep, home workout bouldering wall you want about 100-200 per 4x8 sheet. This spacing allows pretty much complete coverage. You might think that completely covering a wall in holds is excessive. If you have a small wall though and workout on a regular basis you will appreciate the ability to put as many holds as possible on your wall..
Spacing of T-nuts can be somewhat of an art. A totally regular pattern stiffles variety in hold placement, yet a totally random pattern may not give you as much coverage. If you do choose a regular patern then you will get the least gaps in coverage if you use a hexagonal pattern (like the way pool balls are stacked). If you are making a traverse wall only 8 feet high (typical basement application) then you might wish to group your T-nuts more toward the top and bottom of the wall and have less in the middle. Sometmes there are advantages in having some T-nuts close together. If you have made a particularly neat problem and have it wired you might only want to move a hold up 3 inches to make it just a bit more difficult.
You may want to add extra T-nuts to your plywood wall at a later date so try to make it easy to access the back of your plywood panels. If you have the option of adding T-nuts as needed you really don’t have to commit yourself to a set number of T-nuts or a spacing scheme at the onset. If you will not have access to the back of a wall, then by all means be generous with the T-nuts - chances are you will want more later than you origionally plan for.
One option to consider when spacing T-nuts is the location of framing studs behind your plywood. You want to avoid lining up a T-nut with a framing stud since mounting bolts often protrude out the back of the plywood.
T-nut problems
Properly cared for, the T-nuts in your climbing wall should withstand many years of heavy use. Try to avoid tightening your holds excessively or using bolts that are too short to engage all the threads in the T-nuts. These practices can wear the threads excessively and lead to the dreaded "stripped T-nut syndrome." This happens when you are mounting the hold and the bolt is not perfectly lined up with the T-nut. With worn threads you can often force the bolt to turn - but it soon binds in the hole. When you try to take the bolt out the T-nut rotates and you end up with a permanant spinning hold that cannot be removed. The only way to remove the hold is to use a vice grip on the T-nut from behind while someone at the front of the wall turns the bolt.
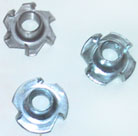
Not all T-nuts are created equal and I've seen lots of different styles. In my experience the best T-nuts are those with relatively thick, long prongs. If the prongs are too thin or short they can bend relatively easy enabling the T-nut to rotate.
For high use walls where holds are changed frequently, you might think about investing in a 3/8 inch metal tap. T-nut threads sometimes get messed up with use so if one starts acting up run a 3/8" coarse thread tap though it to "retap" the threads.
If you are really, really poor or just can’t get T-nuts you can always use a washer and a nut on the back of a panel to attach holds. This method makes it more difficult to change holds around and you must have easy access to the back of your wall to tighten your holds. Most modular holds come supplied with 3/8 inch diameter bolts that you tighten with an allen key. Many people cut a straight segment off an allen key and mount this in a cordless (reversible) drill so you have a super easy method to quickly change holds around.